Ever since Heidi released her Wall Art words available at Michaels stores and in particular the word EAT I have been anxious to add one into my kitchen decor. I wanted it to coordinate with the colors in my kitchen and I think I may have pulled it off with some mint paint and the gorgeous Mint Marquee Love glitter!
I have had this beautiful antique metal and glass platter for a while now and once I started planning how I was going to decorate my word I knew exactly what I wanted to do with it, create a little collection of favorite things on the platter.
Let me share how easy it was to create my Two tone Word Art word.
I started by gathering some favorite pieces from my kitchen and the EAT Wall Art word and playing around with color combos. Once I settled on mint and yellow I got working.
To decorate my word I gave it a quick coat of white paint to act as a kind of undercoat for the colored paint. It really makes the the top coat of paint more brighter when you add this step.
Next I added a coat of Mint paint that I got at Michaels when I was visiting the US in January. I then allowed this paint to completely dry.
I then took some washi tape and laid it down about a third of the way down the word and painted on the Marquee Love glue and then sprinkled on the Mint Marque Love glitter. The washi is essentially to create a nice straight line with the glitter.
Finally I removed the washi, tapped off the excess glitter and my word was complete. I allowed it to dry over night just to ensure the glue was completely dry.
I added some of my favorite pieces to the platter including the beautiful frame and simply laid the Wall Art against the photo frame and placed it in my kitchen.
I love the pops of color it brings to my kitchen, it makes me happy each time I walk into my kitchen and I look at it!
Grab the Wall Art EAT word from your local Michaels stores, some coordinating paint and glitter and create your own decor piece for your kitchen!
Wednesday, February 22, 2017
Tuesday, February 21, 2017
Felicity Jane London
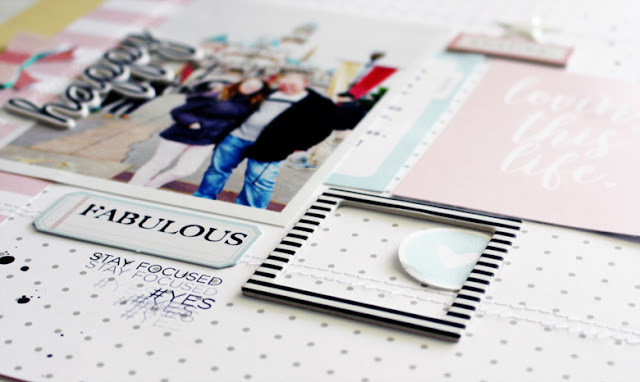
I was thrilled to start designing with my first Felicity Jane kit called London. It was full to the brim of delicious pattern papers and embellishments!
To complete my layout I added some messy stamping with the FJ London stamp set, I love the subtle texture that creates without the bulk.
So let me share with you my first project- a layout I created with the London Kit. Anyone who knows me, knows I love the color yellow so when I opened my box I literally squealed with joy! I love that I was able to add little touches of yellow throughout my layout.
I started with the white and grey spot pattern paper and then trimmed about two inches from the side and turned it over to reveal the soft pink and white stripes which I then adhered to the edge of my layout. I then trimmed about an inch from the yellow pattern paper and adhered it also too the back of the layout to create my background. I laid down my photo and embellishments , marked with a pencil where they were then removed the pieces and used my sewing machine to create a border for my elements
I then used two of the pieces from the 4x6 cut apart sheet to form part of my journaling and title. I ran the blue journaling piece through my typewriter to add my journaling. I adhered my photo on three sides so I could use it as a place to tuck my journalling card into.
I added the Happy chipboard shape to the side of my photo then fussy cut the bow from the cut apart sheet. I trimmed off the bow ends and added them flat onto my page and then adhered the main part of the bow with pop dots for dimension.
To complete my layout I added some messy stamping with the FJ London stamp set, I love the subtle texture that creates without the bulk.
Sunday, February 12, 2017
Valentines Day Chalk Art
With Valentines Day only two days away I wanted to make something special for my husband who is away for work at the moment. What better way than to create a chalk art sign on our front porch so it is the first thing he sees when he arrives home. The Heidi Swapp new Chalk Art Sprays and Stencils were the perfect choice.
I used the letters and letter shadows to create the main part of my signage and then used some of the large stencils to build the rest of my design. Love the pop of red chalk paint that reflects the Valentines Day theme.
To complete my design I added those fun polka dots to add a fun touch.
I can't wait for my husband to come home on Tuesday morning. I hope he will be pleasantly surprised and love it as much as I do!
Saturday, February 11, 2017
Batman is coming...
We all know my boys are the biggest Lego fans, so they are so excited for the new Lego Batman movie to arrive soon. I thought I would celebrate with my Heidi Swapp Lightbox and throw a little party!
Who else is excited!
Friday, February 10, 2017
My Memory Planner plans for 2017
I love a fresh start in my Memory Planner. It always cements my faith in why we do what we do, crisp clear pages ready to be filled with another year's memories. Now I must confess this was attempt number two. It's a girls preogative to change her mind right?! I originally started 2017 in the Love Today Large memory planner and it was working well for me. But then I sat and reflected on my busy schedule , I work full time as a teacher and some days through the hustle and bustle of life there is not much for me to record. So looking through the Time Files Memory Planner I love that I can just record the highlights of my month.
Another thing that drew me to the planner was the soft mint cover with touches of gold!
I also love the elastic band that will hold the album closed when it starts to get deliciously thick with my family's memories !
Prompts on the left hand side and pocket pages on the right provide the perfect amount of space to fill it with family and personal happenings!
Let me share some up close details. In January my family took an epic vacation from Brisbane Australia to Hawaii, Disneyland, Las Vegas and Grand Canyon then finally Phoenix so I began with some thoughts about our upcoming trip. Then the other prompts I completed as the month progressed. I added some of the stickers from the Floral Sticker sheet to my page to accentuate important pieces. I even managed to add some of our tickets from Disneyland and Lego land into my planner with some washi tape.
Favorite photos can be easily slipped in to the 3x4 and 4x6 pockets. I added a few clear stickers and a Kraft notepad from the collection to embellish.
On the flip side of the pocket page I added in more photos and then a Printable that I foiled with my Minc machine and a couple of gift tags that were given to me by Jamie and Maggie from the Media team when we met in Phoenix for the Creativation event. I simple added a little bit of adhesive to the back of the cards and attached them to the pocket.
Remember when I mentioned I started the year in the Love Always planner, well when we were all together I asked the girls to leave me a little message in my planner and when I switched I didn't want to loose these precious notes.
I took the page out of the Love Today planner, trimmed off the 4 holes already punched and used my Cinch to punch holes, then cut little slits into the holes and slipped it into the spiral in my planner.
I
love that it adds texture in my planner because it is a different size.
.
..and the reverse side of the page.
When this extra page is flipped the calendar page is revealed.
I added in 3x3 photos to some of the calendar blocks, intermingling those with journaling, Washi, Floral and Kraft stickers and the cute little Clear stamps from the collection. And now we are in the midst of February and I have slowly started including memories into my Planner including using the Free Planner Printable Heidi shared recently.
I hope that I have given you some easy options to complete your Time Flies planner. It doesn't have to be time consuming, all you need are some favorite memories, favorite photos and a couple of pretty embellishments.
Save
Sunday, February 5, 2017
Welcome to my studio
Welcome to my Studio!
Its been a little while since I shared my studio with you all, and with all the new collections starting to be revealed I thought I would share with you all how I am storing and displaying them in my studio this year.
Let me take you on a tour around my room. I want to share with you how easy it is to make your room be it big or small just that little bit pretty! Let's start as you walk through the door!
I have a large set of shelves with loads of wire baskets that hold some of my favorite products. My Minc foil, Gallery Wall collection pieces, Washi tape and more. I have spaced them around my shelving unit in coordinating groups to allow it easier for me to find things!
I love that my 12 inch Minc foils and Marquee Love glitter are neatly arranged so I can grab the color I need easily! It's nice to allow my products to also provide a little decor as well. I have my Minc reactive mediums and brushes in a glass jar also for easy access.
Moving to the right of this shelving unit I have an Alex drawer storage unit from Ikea that I use for storing my pattern paper collections. On top I have my 12 Inch Minc machine and my regular lightbox which I change often to keep me motivated.
The new Magnolia Jane paper collection sits pride of place in the top draw. My older paper are stored in their own collections in the drawers below.
Hanging on the wall above the Unit is this fun hanging shelf that I found at my local Kmart store. It holds my colored Washi sets from a previous collection. I love how fun this is and brings some pops of color to my room.
Next to the Alex unit I have my Large Expedit shelves also from Ikea. This holds an eclectic bunch of pretty jars, storage boxes and albums holding a variety of Heidi Swapp goodies. Let's take a closer look shall we.
On the top shelf I have my Lightbox storage albums and newest coordinating washi tape as well as my We R Memory Keepers Typeface typewriter coordinating goodies.
On one shelf I have all the ephemera , stickers, Washi and Gold flakes from the new Magnolia Jane collection. Isn't it just so delicious.
Below that I have my new Memory Planner collection pieces including the stamps, stickers and dashboards and 4 hole punch for easy access.
Another shelf holds my Mixed media Metallic Pastes and Art Screen inks as well as the Wood words from Michaels.
On the bottom shelf I have placed a large basket with my Chalk Art spray paints and smaller stencils. I can easily pull the basket out and take it down stairs to use.
Other items on my shelf unit include my Heidi Swapp Cinch, We R Memory Keepers Punch Board and Stapler and Evolution Die Cut machine.
Finally on my Wall Gallery shelves I have placed some of my most favorite planners from the 2017 Memory Planner collections.
The pops of color plus the timeless black and white stripes just adds so beautifully to my studio decor. I can't wait to share with you some of the ideas I have in store for these babies soon.
Thanks for dropping by today. I hope I have inspired you to do a little craft room studio do over or tidy up. It always feels good to get the place tidy so you can make a mess in there again!!!
Subscribe to:
Posts (Atom)