Wednesday, August 28, 2013

almost peaches and cream...

There is a new mood board challenge up at Jot Magazine using this delish combo of soft colours.

I couldn't go past using some new papers and embellishments  from Heidi Swapp including that gorgeous Confetti paper from the Serendipity paper pad,  Color Pop Chipboard Stickers and yummy Color Magic paper goodies.


 I used Clear Pop letters for my title.


I just had to add in that pretty flair from Greatest View.


and some hidden journaling from inside the grey and white striped baggie.


Be sure to check out the Jot Magazine blog for all the details and how to be in with a  chance to win a fabulous prize!

Photobucket

Tuesday, August 27, 2013

fun and laughter!

This layout was posted on the Bella Blvd blog this week. It uses some of the yummy new pattern papers and embellishments from the Playdate collection. My photos of my boys and their little friends at the park were perfect. I added in a couple of QR codes of them on the tyre swing! Just too much fun!


I had an extra photo that just wouldn't fit into my design so I added in an extra photo by attaching it with some washi tape!


Photobucket

Friday, August 23, 2013

School Albums...

Over on the Heidi Swapp blog this week we were celebrating Back to School because in  the Northern Hemisphere the kids are heading back to school. It prompted me to get all my boy's school work, art and photos organised and into some folders. I decided to create two original covers for  the albums. I started with some American Crafts Modern albums which are plain chipboard.
For My youngest son Larsen I wanted to use some of his art work he has created in kindy this year on the cover.


Once I had cut out and attached the art work to the album with double sided adhesive sheets I took Heidi's Sunshine stencil, some white cardstock and two new yummy ColorShine colors Citron and Navy and spritzed to create an Ombre effect.


Once it was dry I used some old rubons (thankyou LeanneAllinson) with a school theme and filled in the rays with the rubons and then added this to the front of my album as well.


 I spritzed a Color Magic banner and added this across the join and added some paper and a Color Pop frame. I also popped on a School flair from Greatest View.


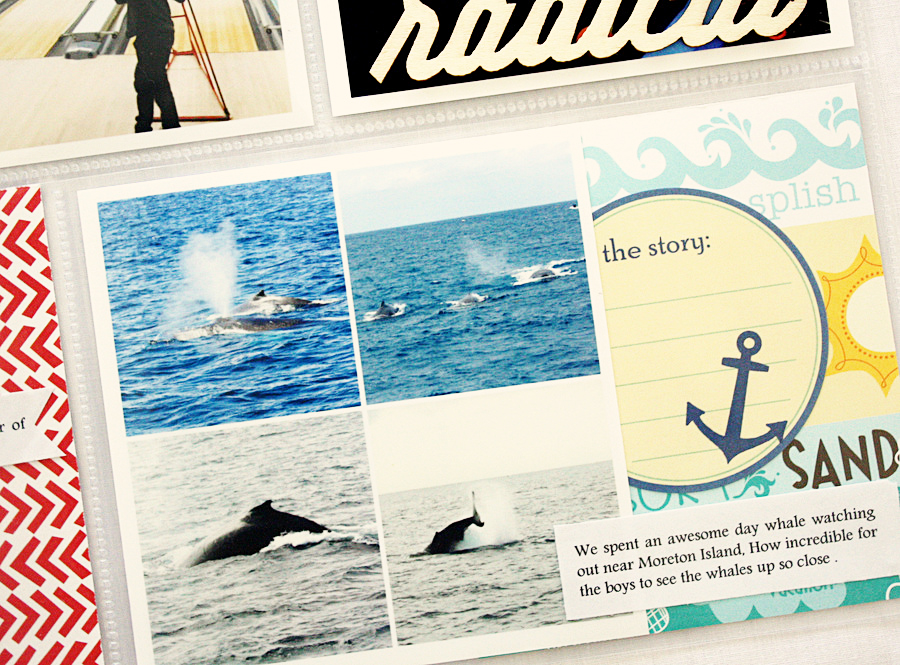
Here's a sneak peak of what's inside my album. I will start each year with a 5x7 photo then a large clear envelope to hold special pieces of art work and other important items.


I took some pocket page plastic sleaves and added photos from throughout the year.


...and also took photos of large pieces of art that could not fit into the album.


For Addison's album I decided to create a Mixed Media cover. I have an in depth tutorial on the Heidi Swapp here showing how I created it.


After I painted my background I added texture using stencils, rubons, stamps and pen. I cut and pasted the school house out of Serendipity pattern papers and old book paper.


I did get messy with some more Heidi Swapp stencils , texture paste and Colorshine.
This one uses the hexagon stencil and Tinsel Colorshine.


These dots are from the 6x6 Polka Dot stencil.
Heidi created the school word and I cut it out with my cameo and spritzed it with Tinsel Colorshine. You can download the school word for free on her blog here.


More texture created with stencils and rubons.


and more sneaks inside the album.


I plan on updating the album at the end of each term to try and keep on top of it.
For my Aussie friends you can find all these goodies in several online stores including
Thescrapbookstore
Sassyscrapper
Thestampspot


Photobucket

Monday, August 19, 2013

more on life....

Sharing week 27 of my PL on my blog today. In reality I am all caught up, just not caught up on photographing my spreads.
 

The left side..
 We were on school holidays so there were lots of  kids activities this week.


..and the right side.


I created an interactive element to my page by attaching the top photo to the plastic sleave pocket with washi tape .


Photobucket

Wednesday, August 14, 2013

the last...

Sharing the last of my projects I created for American Crafts DT call. First a layout with my youngest as the focus sharing a story of his fun easy going nature.


And a quick shaker card.


Photobucket

Sunday, August 11, 2013

love notes...

There is  a new Mood Board challenge  over at Jot Magazine, using these stunning colours. To play along create a paper craft project- be it a layout, card or OTP what ever you choose, using these colours then  link it up over at Jot Mag to be in the chance to win a fabulous prize from
 Inkurable Artistry
 I decided to make a love note baggie for my husband. I had to keep it flat so I can slip it into his laptop before he goes to work. I used a Zebra Print bag from Greatest View to hold a love note, a photo and a QR code of a video of  our family that he can scan with his QR reader on his iphone.


I then layered it with a chipboard frame, pattern papers and an artisan heart from Heidi Swapp  I tied it with some silver cord to finish.


I am going to slip it into his laptop tonight ...I wish I could be a fly on the wall when he opens it at work tomorrow!

Photobucket

Friday, August 9, 2013

the ART BOOK.

Over on the Heidi Swapp blog this week we were being inspired by episodes from Heidi's My Craft Channel show called "Create To Remember". I was inspired by this episode call The ART BOOK seen here.


Everybody knows my eldest age 6 is crafty likes me and loves to draw and lately my youngest aged 4 has taken an interest in drawing too, so I decided to create an Art Book for each of them.
I used the No Limits collection to make my books- adhering them to some chipboard sheets that I cut to size. Once I had decorated the covers I had them bound at my local Officeworks.


Inside the book I created some drawing prompts to jump start their creativity. You can find these prompts on Heidi's blog here - I made them into a  PDF file if you are interested in creating a book for your boys.

 
Both my boys loved them.


I was lucky enough to have Heidi write out both my boy's names in her trademark handwriting, which I then cut with my Silhouette and spritzed with ColorShine.


Everyday they ask me if they can draw in "their" special book, I love that I have a keepsake that I can keep for years to come and look back on and see what my boys were drawing.


Photobucket