Tuesday, July 24, 2018

Heidi Swapp Neon

In a house full of boys sometimes I need to give myself a little girly time! Recently my husband put together this fun Ikea table for me to make my own vanity table! I just love it. When I saw the
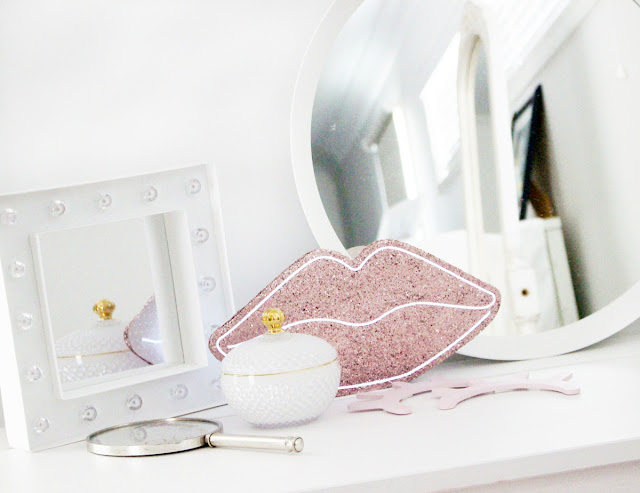
Heidi Swapp Neon words and Images and in particular the lips I new straight away I was going to use it on  my vanity table.

Heidi Swapp Neon

The lips come white so i did a little DIY and added some of the pink Marquee Love glitter.


Heidi Swapp Neon

Once the glitter was dry I threaded through the white Neon wire and placed it on my table.


Heidi Swapp Neon

I just love the way It sits nestled there amongst  some of the pretties on my vanity!

Heidi Swapp Neon

The glitter shines so nicely!

Heidi Swapp Neon

and it coordinates so nicely with the other items on my desk.

Heidi Swapp Neon

I love coming home from work and turning the neon and, it lights up my whole room.

Heidi Swapp Neon

On the other side of the table I have a few pretty items and a favourite family photo!

Heidi Swapp Neon


Photobucket

Sunday, July 22, 2018

Embrace the glasses


 I am thrilled to be joining the Paige Evans' Silhouette team! I am here to share my first layout with some of Paige’s delicious cut files. As a mum to two boys my scrapbooking mostly revolves around their crazy boyish antics, but occasionally I like to create a page about myself. When I saw the Sunglasses cut file I couldn’t help but be reminded of the glasses I have just begun to wear because of my declining eyesight. I wanted to create a big impact with the glasses so I cut them full size from white cardstock using my Silhouette Cameo.


I wanted a fun eclectic feel to my glasses so using an exacto knife, I trimmed out the horizontal lines in one of the heart lenses. I then laid the glasses cut file down on my base cardstock and added some 1canoe2 constellation rub-ons and then added a clear transparency on the underside of the cut file. I also added in a couple of gold glitter stars punched from gold glitter paper from my stash to create a fun shaker element to my page before laying the white base onto the diagonal black 
and white stripe patterned paper from Crate Paper 


I then used Paper 24 from the Turn the Page collection to back the other lens. I added pop dots all around the under side edge 
of the sunglasses to create some depth and dimension to them.


Thanks for joining me here today!

Photobucket

Sunday, July 15, 2018

World Emoji Day!


Today I am celebrating world Emoji day with my Heidi Swapp lightbox!
Now when I was doing a little bit of research about Emojis I came across this fun fact!
This is not a Poop emoji. In fact it is a chocolate icecream emoji! Haha - can you even believe it!!!! The worse case of mistaken identity ever!!!!!!

Heidi Swapp lightbox

I just had a little giggle to my self and decided to have a little ice cream party for my boys!

Heidi Swapp lightbox


So next time you are playing around on your phone take a moment to pay homage to the chocolate ice-cream emoji...it just might make your day!

Heidi Swapp lightbox

You can find the Heidi Swapp lightbox and accessories at your local Jo-Ann store!

Photobucket

Friday, July 6, 2018

School inspiration board with my Heidi Swapp Neon words


If you are a teacher like me,  then you know that school vacations, although welcomed are never really restful. You are always planning, organising, making and creating ideas and resources  for the next term or year.

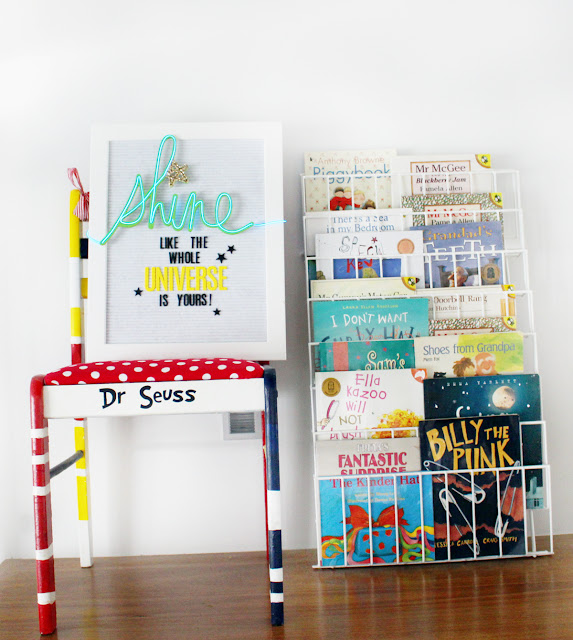
We are half way through our school year here in Australia and I am alway looking for fun and fresh ideas to inspire my students. I grabbed one of the new  Heidi Swapp Neon words and wire and my Letterboard  both found at Jo-Ann Fabric and Craft Stores and set to work in creating an inspiration board for my classroom.

Heidi Swapp Neon words

I started with the Neon word Shine and gave it a couple of coats of  lime paint I had in my stash. I then added some of my Gold Marquee Love Glitter to the star section of the Neon word for a touch of fun. Usually the Neon wire is threaded through this star section as well, but I wanted to add a touch of shimmer and shine instead. Once dry I followed the directions on the back of the packaging to thread my Blue Neon wire and I was complete. 

Heidi Swapp Neon words

I then grabbed my large white letter board and completed the rest of my quote. I used the Black 1 inch letters and White 2 inch letters that I had previously spray painted yellow and a couple of stars from the Everyday Icons set to finish off.

Heidi Swapp Neon words

I used a touch of blutac to the top of the letter h and some tape at the back of the Letterboard to hold the battery pack and Neon wire end in place.

Heidi Swapp Neon words

I love the combo of green, yellow, black and gold...perfectly bright and fun for my classroom.

Heidi Swapp Neon words

I still have a week to go with my school vacation, but I am  excited to head back to school with my Inspirational letter board. I know my students are going to think the Neon is so cool!
Don't forget you can find the Heidi Swapp Neon words and  Letterboards and accessories at your local Jo-Ann Fabric and Craft Store.

Photobucket