Sunday, August 19, 2018

Glamping with Heidi Swapp Storyline

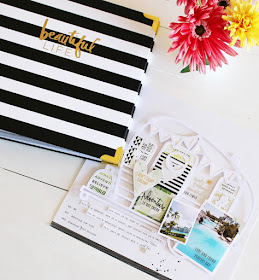
If you know me you know my scrapbook style is simple with a touch of quirkiness. I love trying something a little unexpected too and using a cutfile with some of the Heidi Swapp Storyline Deck of Days cards is just the thing!

Heidi Swapp Storyline

Earlier this year we took a vacation to the beautiful Sheraton Mirage hotel in Port Douglas and there is nothing I love more than a beautiful hotel and I wanted to create a layout to tell this story.

Heidi Swapp Storyline

I found this fun cutfile from Paige Evans and grabbed some of the Deck Of Days stickers from the Adventure set and set to work.

Heidi Swapp Storyline

I backed parts of the cutfile with the square Deck of Days stickers, sometimes trimming the cards to fit into the shapes of the cutfile.  I then used pop dots to adhere the cutfile to my base Storyline cardtstock.

Heidi Swapp Storyline

I added my photos with pop dots and then added some of the stickers from the Heidi Swapp Sticker book to complete my layout. 

Heidi Swapp Storyline

I just love my layout and I just love this technique, I can't wait to try it again. You can grab the Heidi Swapp Storyline collection at your local Michaels store!

Photobucket

Friday, August 17, 2018

Heidi Swapp Lights in my kindergarten classroom

I love when I can combine my love of teaching kindergarten with my love of all things Heidi Swapp.
Each year I change up my Kindergarten classroom just a little depending on my students and depending on what Heidi Swapp goodies are new!
This year I couldn't wait to include some Neon and the Lightbox Glow  as well as the
Regular lightbox. Let me share some of the ideas I have used them for!
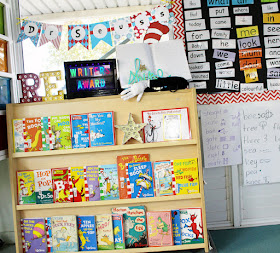
My kindergarteners have come along way with their writing in only 6 months at school. Each day we celebrate their writing with one student having their work chosen to be apart of our store writers award!

Heidi Swapp Lightbox classroom decor

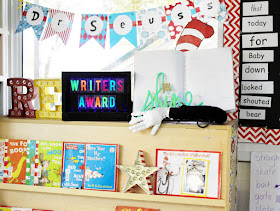
I use the Lightbox Glow as a way to share what area we are celebrating. 

Heidi Swapp Lightbox classroom decor

The kids love how each letter glows a different colour. I am using  the 
Black Light Reactive Multi Pack and I like to turn down the lights in the room when I turn on the Lightbox glow for the wow effect.

Heidi Swapp Lightbox classroom decor

 They also get to share the amazing writing on our fun Cat In the Hat stand and my Shine Neon word.  I painted it with some mint paint and then used the mint green Neon wire inside the word.
My students like the freedom of choosing how the Neon light is switched on, either still or flashing!

Heidi Swapp Lightbox classroom decor

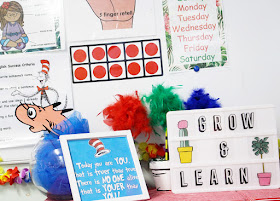
I also have an area in my room where most of my teaching happens, I have an awesome interactive whiteboard and on the table where my computer sits I like to share some inspirational quotes to motivate my students. I usually use my regular Lightbox in this area.

Heidi Swapp Lightbox classroom decor

I change the quotes up regularly, for now I am using the Plant Lady Icons and the letters from the Party Accessory kit to spell out my  quote.

Heidi Swapp Lightbox classroom decor

Recently it was science week at out school and I used the Lightbox Glow to help me with a little experiment. We were wanting to make some glowing water so after a little research online, we used the inside of a highlighter, a glass of water and the Lightbox Glow.


The experiment needed a black light to allow the phosphors in the highlighter ink to glow...

Heidi Swapp Lightbox classroom decor

The Lightbox Glow was the perfect black light and we turned off the classroom lights to see what happened.... but we wanted to really take it up a notch so we found an empty storeroom and turned off the lights!

Heidi Swapp Lightbox classroom decor

It wowed me and it certainly wowed my students as well. There were a few squeals and lots of explanations of OOOOOs and AAHHHS!
Having 
Don't forget you can find all the Heidi Swapp lightbox and Neon goodies for your classroom at your local Jo-Ann Craft and Fabric store!

Photobucket

Monday, August 6, 2018

Color Pour

I am thrilled to be sharing a fun new project with you today.
American Crafts have just released an exciting new program called Color Pour. It takes all the guess work out of acrylic pouring art because all the measuring of the pouring medium  has been done for you. If you know me you know I am not a messy crafty but this was so simple to use I am going to try it again and again.

American Crafts Color Pour

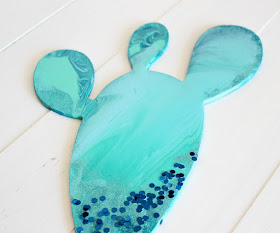
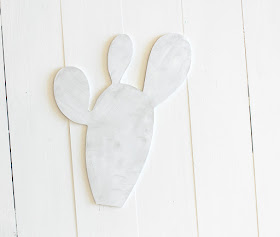
I have had this MDF wooden cactus in my stash forever and wondered if the Color Pour paints would work...well let me tell you they worked beautifully as you can see above!

American Crafts Color Pour

The collection comes with a variety of packs and paints and I was lucky enough to try the Teal Paint kit that comes with 4 shades of perfectly coordinated colors...

American Crafts Color Pour

... and the gorgeous blue Glitter Kit that contains 3 packs of glitter including the fine aqua and the gorgeous navy blue chunky glitter.

American Crafts Color Pour

I just love the effect that is created. and best of all it was so easy to do. Let me share my process with you.

American Crafts Color Pour

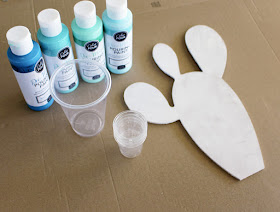
First I gathered my Color Pour supplies, the paint and the glitter.

American Crafts Color Pour

Next I painted my piece of MDF wood with some gesso and allowed it to dry.

American Crafts Color Pour

I found some plastic cups at home, one  larger and 4 smaller shot glasses. I also grabbed  a large  piece of scrap cardboard from a cut up box for  a drip tray.

American Crafts Color Pour

I measured out 4 equal amounts of paint in each small cup just be squirting out the paint.

American Crafts Color Pour

Next I poured the smaller cups into the larger one, pouring the paint from lightest to darkest.

American Crafts Color Pour

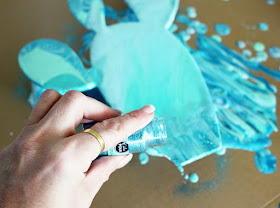
I then picked up my cactus, turned it upside down and placed the open mouth of the cup against the wood. I then quickly flipped the cactus over and sat it down on my cardboard. I allowed the paint to drip down for a minute then lifted the cup. The best part was manoeuvring the paint around the cactus by tilting it back and forth until all the surface was covered.

American Crafts Color Pour

I then placed the cactus on three of the small plastic glasses to allow the excess paint to drip down onto the cardboard. I then sprinkled some of the fine aqua glitter onto some of the areas of my paint.

American Crafts Color Pour

I then grabbed the blue glitter and spinkled some on the lower section of the paint.

American Crafts Color Pour

I then left the cactus for 24 hours to dry completely. 

American Crafts Color Pour

I just love how it turned out, my older son claimed it for his study so it looks like I need to make another one! You can find the Colour Pour collection now at your local Jo-Ann Fabric and Craft Store.

Photobucket