Friday, May 30, 2014

All this week on the Heidi Swapp blog we have been sharing stories about our selves and our selfies!


I decided to create a layout with an added bonus of a memory file which allows for extra photos and hidden journaling inside. I used the soft pastel colours of the Dreamy collection to create my project.
 I went the brave route and decided to use a full sized selfie photo as the cover of my memory file.


I added a few pieces from the Dreamy Ephemera pack to finish the cover.


Upon opening the album you will find this double page spread.


On the left I layered another photo on some Dreamy pattern paper.

 
and used one of the layered stencils to spritz some Color Shine polka dots on the water colour tag.
 

 I  created my own patterned transparency using some texture paste, Color Shine and a transparency.
I share the technique in this video here.


Underneath the transparency I added some favourite family selfie photos and a jumble of Dreamy ephemera.


On the left side I used the selfie cut file Heidi created just for the selfie series on a memory file and added some more Dreamy pieces to create the cross word effect.


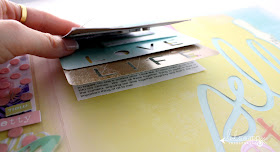
To add some hidden journaling I used the photo stack from the Dreamy collection to create some layers. I had my husband, boys and a few friends write me a simple note to add to my project.


and I added my journaling as well to complete my project. It was a very rewarding  process to get my thoughts down and more importantly very cathartic too.


I hope you had a chance to play along with us on IG sharing your selfies, it was a lot of fun !
Photobucket

Wednesday, May 28, 2014

happy birthday

Popping in quickly to share a few cards that were up on the Jillibean Soup blog recently. I have been playing with the fun Birthday Bisque collection. Super easy to get some Birthday cards whipped up in a hurry.


Photobucket

Friday, May 23, 2014

2 months later....

Today I am sharing almost two months of my Heidi Swapp Memory Planner, yikes where is the year going...
Lets start with April.


For April I decided to dedicate the month to things that make me happy!


I added in a  QR code of my favourite song at the moment Happy so when ever  I want to watch or listen to the song I can simply scan it with me phone.


Being School Holidays there were lots of fun kids activities.


I included a gorgeous drawing from my youngest.


Turning the page to the calendar page.

More school holiday fun.


I love that I have captured the every day in our lives.


Next comes May.

Being the month of Mothers Day I decided to use the prompts page to record some thoughts on being a mum.


Favourite photos from Mothers Day, along with Heidi's FREE printable found here.


May isn't over yet , I still have some photos to add but I wanted to record our selfie series on Heidi's blog this month.


My boys made me some Mothers Day cards at school and I needed a way to keep them safe in my planner.


I used some small magnets disguised by paper circles on the planner and magnets on the back of the cards to hold them in place but can be easily removed to add to or view the calendar.
 

More QR codes of videos of my boys that I want to cherish in the future....


Ill be sure to share June very soon.
Photobucket

Monday, May 19, 2014

it's a date!

Sharing the last two of my projects for this months DayLight kit from Scraptastic.
Again the bright happy colours and patterns were calling my name.
This first one tells the story of my husband and I on our  recent date day.


I had to record this little memory of my boys, I added in a qr code of a little video of them I made with them calling out to me.


The embellishments in the kit are to die for.


Photobucket

Friday, May 16, 2014

daylight...

This months Daylight Kit and Add on from Scraptastic was right up my alley with lots of yellow for me to play with.
 
Today I am sharing two of the four layouts I created with the kit.
 
This first one uses the fun exclusive stamp set with the lightbulb element.


I created a border across the top of my page with the stamp then used my son's yellow pencil and a sharpener to do some shading inside the bulb.


I wanted to include his drawing on my layout so trimmed it down and adhered it to the bottom of the layout.


This second one shares the story of my boys soccer boots that they just couldn't wait to wear for the first time.


Love that large ampersand  that comes in the kit.


I played around with an app on my phone to get the interesting effect o the photos for a bit of difference in my layout.


 Thanks for visiting.
Photobucket